Dec 12, 2012

Cold and Rain

Wishing for Warmer & Dryer Weather!

The last few weekends we have not been able to lay blocks either due to rain or cold. So for everyone looking for an update, please pray for some dry days and some warm weather.  All of our research says that unless you are a professional mason you shouldn't attempt to lay blocks if the over night temperature is expected to be below 40 or if rain is forecasted within 12 hours of the last block you lay.  So at this rate it is going to take a while to get the block wall done.

Christmas is right around the corner, which means we have family coming in and Ken will be working a lot of overtime so we may not post again until after the New Year.

Merry Christmas and Happy New Year!

Flooded Foundation
Update:
It rained for the 3rd weekend in a row!  Only as you can see it rained a lot more this weekend than it had before.  We are going to see if it will dry out on it's own over the next few days of sunshine, but if not we have a pump to get rid of the excess water.  Rain rain go away!


Dec 3, 2012

Foundation Blocks

       We may have mentioned in previous posts that we are not building on a slab, instead we are building on a crawl space and we will have a concrete block wall for our foundation. This type of foundation is not used very much in our area but it is highly recommended when building a log home.

Our first 17 blocks.
       This weekend we were able to begin the task of stacking blocks. Our crew consists of a plumber, a photographer and a high school student, none of which have ever buttered the first block.  Ken has watched masons at work on the jobsite, and Lisa has watched hours of video instruction on the subject; needless this should be an adventure.  Since we had to make a few attempts to get the right mixture of the mortar and we are still trying to find a good rhythm for the job; we didn't get a lot done the first day.

The good news!  The next day when we checked on the blocks they had all held together...Yeah!

In the weeks to come and as weather permits we will be stacking more blocks, it is a very detailed undertaking.  We have decided that we need to weld additional rebar to what is already there so that it comes up to the top of the foundation, next we will stack everything 3 blocks high (8x8x16 blocks) and follow that up with pouring concrete into every hole that has rebar in it and finish up by stacking a 4x8x16 and a 4x4x16 block on top to make ready for the floor joists.

With the Christmas holiday fast approaching we can safely say that we won't be finished with the blocks by the end of the year.  While all of these steps are necessary we are all ready to start stacking logs.

More Concrete Work

Footings for the fireplace and several piers.
In the crawl space of our home we will have 7 piers and a foundation for the fireplace and each of those had to have a 12" deep footer.  We are proud to say that those footers are now poured and curing.
In a few days Lisa and John will go back and take off the forms and fill in around the footers and hopefully get the ground smoothed out some.

Nov 19, 2012

Welding

While we were getting the initial foundation footing ready we discovered that it was quicker to weld the pieces of rebar together than it was to use traditional rebar ties. 

Now that the perimeter footer is in place we have turned our attentions to the footers needed for the 7 piers and the fireplace.  We chose to weld these rebar sections also. 
 
The plus side of this is that John got to practice his welding skills too.  In the picture you can see that John is welding the fireplace rebar and behind him you can see the pad and uprights of rebar that will go in each pier.  We hope to have the piers and fireplace footings poured in concrete this weekend.

Nov 14, 2012

Research ~ Research ~ Research

We fully believe that research is the key to making the right decisions.  We don't go buy a new car without doing several months worth of research on different brands and models (although we usually come back to Ford and Mustangs are a family favorite), we just feel more secure in our choices if we have studied them to death.
At any one time we are researching and learning about several different topics, this week our list toppers are ...
1) The size of a fireplace so that we can determine the size that we will need to pour the fireplace footer.
2) Different types of metal roofing; with a top runner being Interlock Slate Roof.
3) How to make your own rock for the fireplace, foundation wall and around the porch posts. These "rocks" are made from colored concrete in a mold, it is a lot more time intensive but we project the cost savings to be HUGE! (over $5000 saved)
4) How to lay cement blocks.
Of course we will post links to the companies that we choose to work with, when we make the final decision.
Since we need to know the size of the fireplace footer before this weekend that one had to take priority, and next will be the block laying and we have to make sure that we get it right. (You-Tube videos are GREAT!)
Even though we won't be needing the roof or the rock for quite a while, it is good to have a game plan.  I have estimated that if I make the rock myself I will be able to make about 24 rocks per day and it will take me about 3 months to make all of the rocks that I need, but I can wait for warmer weather to get started on those.  The roof seems to be one of the hardest decisions for us; we like metal roofs but we want to do something different than all of the other log homes out there.  Most log homes that you see have a hunter green standard metal roof, and while we agree that this is a great look we are trying to figure out how much of a statement we want to make. (also how big of a statement our bank statement can handle!)  We may end up with a standard metal roof and just choose a different color or we may find something else along the way that is unique and affordable.
So grab an extra cup of coffee (our favorite is Kona from The Bad Ass Coffee Company) and get ready to Google your fingers off.

Nov 13, 2012

Pouring Concrete


The concrete footer is finally done!  With the three of us and some help from Randall, Glenn and Ray we were able to get the entire footer done.  We had no choice but to do it over a span of a few days so we had to make some cold joints in the footer, but it all worked out OK.

Lisa and John did the mixing, we used a premixed sand and gravel from our local gravel pit mixed that with water and portland cement and ta-da...we have concrete.  (side note...if we can do it, ANYONE can do it)


Ken put the mix in the forms and smoothed it out making sure that the cold joints were in the right places according to the prints and making sure that the mix was in and around the rebar for the best compaction.


With the help of family and friends who came over on various days we had them run the tractor back and forth between the mixer and the forms.
 
We still have a few more things to pour, but they are small.  We have a total of 7 piers inside that need to be placed and the footer for the fireplace.  The toughest part of that is going to be the fireplace, we don't know which one we are going to use so it is hard to know just how big to make the footer.  The print calls for 6" in each direction in addition to the size of the fireplace unit, so at this point we have looked at several companies online and we have chosen the dimensions of the largest one and we will add our 6" to that figure; it may end up being overkill, but we don't want to guess too small since adding concrete later would not be an option.
 
Although no one likes mixing concrete, try to get as many friends or family to help you as you can get...you will NEED them!

Nov 8, 2012

Our Final Prints Have Arrived

At long last we have the final prints from the architect in hand!  They were nice enough to provide us with the foundation plan quite some time ago so that we could go ahead and get started on the dirt work and the rest of the foundation, but now we have all of the prints and it is signed and sealed by the architect and the engineer.  (Imagine that you now hear a huge sigh of relief!)  We don't want to bog down the site by posting the entire plan but here is the drawing of what the front of the house will look like.  If anyone would like to see the rest of the prints please email us and we will send you an e-mail version.

Ready to Pour Concrete

Just before the concrete went in the forms.

This is what our site looks like just before we began pouring the concrete. 
Rebar is bent and welded in place...bring on the concrete!
The forms are in place, the rebar is welded in and we are ready to go!  Our plans called for rebar to be horizontal in the footer area and to have upright pieces every 32" on center.

Oct 30, 2012

Digging the Foundation

Hard at Work
This weekend we had a lot more success in digging the foundation.  We were able to get the trac-hoe hydraulic problem fixed and with of it we were able to dig the trenches all the way around.  We were even able to start putting the form boards in place for the concrete.  Lisa and John will be working more on the form boards and getting the rebar ready and hopefully we will be able to start pouring in the concrete this next weekend.
Now that we are seeing more progress each week we will be able to add more posts to this blog.

Oct 29, 2012

Easy Logs

Loading logs the easy way!

Normally we cut down several trees, limb them and cut them to the length we need and then we load them up on the trailer.  This entire process can take hours and hours just for one load.  We were contacted this week by a man who had be contracted to cut some trees and he decided to give them to us rather than burn them in place.  We ended up getting 24 wall logs and about 40 pieces that are 11' long that we will put on the mill and make dimensional lumber with.  The good news for us is that he and his crew cut them down, limbed them, cut them to the length we requested and then used their trac-hoe to load them onto our trailer for us.  All we had to do was back the trailer in place for him and strap everything down, bring the load home and drop them in the yard and go back for more.  What a great deal!  I have looked and the wonderful man does not have a website, but if you are in our area and you need tree removal, dirt work or even something like a mobile home moved; call Mike Ramsey he is a great guy and charges reasonable prices.

Oct 24, 2012

Foundation Frustrations

We have a great friend who is renting us his mini trac-hoe for a really low price and we couldn't be happier.
We unloaded it off of our trailer and decided to pull up 2 stumps that would have been loacated under the great room and ....BOOM...Ken hits our current sewer line.  So we go and buy all of the stuff to reloacate the sewer line (it was going to have to be moved anyway) and we spent the next 4 hours getting the entire house foot print laid out and making sure that all of our lines/walls were square and true.  Ken climbed back up on the trac-hoe and dug our first scoop of dirt (see picture) and then the hydralic seal blew out on one of the arms and we couldn't get it fixed until the first of the week.
Our First Scoop of Dirt for Foundation


Update: I am happy to report that we have the fixed arm back and we are now waiting for Ken to come home for the weekend and get to digging again.

Protect Your Logs


    Wood boring insects are a potential problem with any log home.  In Louisiana the bugs seem to be very abundant.  When we peel the logs we will treat them with a high quality insect and fungus treatment and then seal it in with a stain.  Until we get them peeled we are trying to keep the pesky little bugs at bay using a cheaper spray and so far it seems to be working fine.


When we start peeling and stacking logs we are planning to use Penetreat for the bugs and Capture stain, both of these products are made by Sashco.  We will eventually follow up with an additional coat of stain and a coat of clear and some caulking in the gaps, all of the products that we plan to use will be from Sashco.

Ken spraying what will be our sill logs.

Aug 20, 2012

Facebook is your FRIEND.

We know that many people (Ken included) do not like facebook...too much drama etc.  Well, while you are building a home facebook can be your friend!

This week Lisa was browsing on a local trading site and found someone who was selling this wonderful cement mixer...just what we needed.  It is a great piece of equipment and will help us do the foundation work a lot quicker.
We have also used facebook to sell some of our things that we no longer use.  Lisa keeps an eye out for building materials and other equipment everyday.  Now if someone would just post a hot tub we would be a very happy bunch of Bares. 


The Mill

When you think of a log home, you think of those wonderful round logs, well in truth some of them have to be flat on one side.  The sill logs and the loft floor joists and even the purlins for the roof have to have one side that is flat.

While most people use a special tool attached to their chainsaw to make the flat cuts, we are fortunate enough to be able to have a portable bandsaw mill.  Traditionally our mill can cut up to a 16 foot long log, but to our good fortune we found some extensions and we can now cut up to a 56 foot long log.
This will make cutting the sills, joists and purlins a quick and easy task. (we hope) Also we can now cut long dimension lumber if we need it for the floor or the roof, no scabbing pieces together...yeah!

For those who are curious, this mill is a Timber King B-16.

Jul 30, 2012

John's First Tree

While normally John and Lisa only cut the limbs and tops out of the trees, on Saturday John got a chance to cut down his first big tree.  We are happy to report that he dropped it right where he wanted it to land and most importantly, he didn't hurt himself or anyone else.

Jul 18, 2012

Design & Inspiration

     Over the years of planning for our home when we look at a magazine and we "ohhhh and ahhh...this is the kind of house we like...these are the details that we are looking for" it is very interesting to us that most times those homes were built by one of the 3 same log home companies over and over.  Well since we were not able to purchase a shell we did take the liberty of using some of the details from them as inspiration and incorporate them into our design.  One company in particular was Montana Log Homes.  We really loved the extra little things that they do in their homes and we have borrowed/stolen a few of those ideas to help us make our home more unique than other homes in our area.  There is an old quote “Excellence is in the details. Give attention to the details and excellence will come.” and that is what Montana Log Homes has done and what we hope to achieve in our home.  So if you are looking to purchase a shell....give them a call, you won't be sorry.

Jul 11, 2012

A Visit with the Architect

     During our recent trip to Montana for Log School, we decided to fly out a day early and drive to Idaho and visit with Josh from Design Intelligence.  First let me say that the drive from Bozeman, MT to Rexburg, ID was absolutely gorgeous. Then with that being said, Josh emailed our first draft of the design to us so that we could review them on the flight out.  When we got there he had a set that we 'marked-up' and made the changes on, and he had also printed out a set for us to take with us for further review during our trip.  We were thoroughly impressed with how few changes we had to make to this first draft.  This told us that Josh had truly listened to what we wanted and took our ideas and put them on paper.  We showed these plans to our log home instructor and he said that it will be a challenging project, but we can do it.  We are now waiting on the revised prints, and we are confident that there will be few if any revisions from here.  We were a little apprehensive about choosing an architect from so far away, but there just aren't any in our area; but all of our concerns were put to rest when we saw the work that Josh had done.  While we feel that our design is in good hands and we now know that Josh is on the same page as we are; we are glad that we took the opportunity to schedule the meeting and work with him face-to-face.

Log School

These are some tight fitting notches!
     We had a GREAT time learning how to build our home.  Al Anderson is truly a great teacher and a fount of information about logs.  We had so many questions about the building process and he answered them all and then some.  We were nervous about the scribing, but now that we have had hands on experience...it is a piece of cake. 

Scribing with the Bulls Eye Scribe
 is easy and fun
If you are wanting to purchase the BEST scribe for any type of log building then please follow the link and buy one from Al, you won't regret it, the Bulls Eye Scribe is the best and easiest to use.


Lateral cuts make the logs
fit tightly without
chinking.
    

If you are reading this blog because you are wanting to build your own log home, please contact us and we will tell you just how great and valuable these classes are.  Yes these classes are a value!  We spent quite a bit of money to go to Montana (but we made it into a vacation also) but the vast amount of information that we learned in just 5 days will make all of the difference during the construction of our home.  

     
Using a gouge chisel makes
the notches fit perfectly
We also recommend buying the video course from Al, watch it before you go to class and it will help you be ahead of the learning curve and of course we can watch them over again if we run into questions.


**PLEASE note that this video course is designed to accompany the log school, you should not expect to purchase these discs and then be able to build your home.** 


Jun 7, 2012

Our First Log.

       Bringing home our first log is a wonderful feeling.  It is the realization that we are taking our first major step towards building the house.  Up until now all of our plans and everything have been just a collection of thoughts and notes on paper; this is the first tangible thing that we have done. 

        In a way it is kind of like bringing home your first child...you can't wait to show it off to tell everyone all about it.  So with that being said...Our first log is 46' long and has a butt of 16" and a tip of 12".  As you can see it didn't quite fit on the trailer and we only had about 2 feet of clearance to keep the tip from hitting the road.  Thank goodness we didn't have far to go to bring it home.  It is also fitting to us that this first log came from the yard of our church; this tree is so large that it has been there since my husband was small.  If only this tree could talk, what would it say about all of the wondrous things that have happened at our little church.


       This log will most likely be one of the logs that will be used as the floor supports for the loft.  It has the honor of having the #1 lid/tag attached to the butt end and we will update this post with a picture of it in the house sometime in the future.

      We have many more trees that we are adding to the list, but no tree will be as special as that first tree.

An Architect at Last.

                      At last we have decided on an Architect for our project!

    We interviewed and submitted plans to a total of 11 companies and it took us a little over 1 month to reach our final decision.
       We have chosen to work with Josh Wood of Design Intelligence

    We have been pleased with everything that we have asked of him and especially his quick responses to our requests.  We contacted him about a quote for the job, and then we asked for pictures of his work, next it was references, and then samples of foundation and roof plans...he is always quick to reply and sends us the information that we requested.  So our signed contract and a check for them to begin working on our plans is in the mail.  Please check out the website above and get in touch with them for your designing/drafting and engineering needs.

May 8, 2012

Our Favorite Tools and Such.

**Please note that we will update this post when we find a tool that is needed or useful and if possible why we feel that one brand is better than others.  So check back often for updates! (In most cases we have made the link direct straight to our favorite tool rather than the company homepage.)
We have added a quick click button on the home page so that you can visit this list without searching.**
 
Unfortunately our favorite store does not have a website; but if you are in our area, then we HIGHLY recommend The Castor General Store. Matt and the gang will help you with just about anything that you need.  We have bought lumber, cement blocks and much more from them...and since they have groceries too it really is a one-stop-shop.

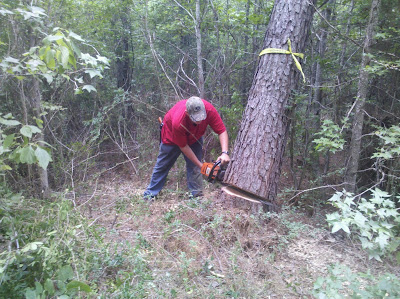
Stihl chainsaws...this is the ONLY brand we use.  We have 3, Ken uses a 660 to cut the trees down, Lisa and John use a 250 and a 170 respectively to remove limbs.  We plan to use the 660 to cut the wedges for the notches and the 250 to clean the notch up. Here is a link to our favorite Stihl Dealer. We also own other Stihl products...and don't forget to buy chainsaw safety equipment.

Red Wing Shoes....we all wear Red Wings; Ken wears them for his normal job too.  They are durable boots that work as hard as you do and keep your feet in comfort all day long.  We recommend that you purchase a pair that has some type of safety toe to help protect your little digits from those big logs.  They are more expensive than the type you will get at your local department store, but they are far more comfortable and will last a LOT longer.  When you visit your local Red Wing store they will measure your foot and they have large sizes and wide widths on most of their boots.  (John wears a size 15EE..and they even had a large selection for him and some that were even bigger!)

Ebay!...This is where we shop for our gouge chisels.  You could run yourself ragged looking in all of the antique stores and pawn shops and never find one, but you will probably find 1 or 2 a week that is being advertised online.

Timber King Sawmills ... This is the brand of mill that we use to cut our sills, purlins, joists, dimensional lumber and MUCH much more.  If a new one is not in your budget then look around and find a used one, that is what we had to do.  We get most of our blades and supplies from Cook's Saw.

Facebook...is a great tool to find used equipement and other supplies.  Join all of your local trading or backyard sales sites.  The best one in our area is Hicktown Trading Post.

Bobcat...one of the best purchases that we have made EVER was our Bobcat tractor (CT230).  We have a lot of accessories for it too; including a bucket, forks, bushhog and more.  There isn't hardly a day that goes by that we don't use this great piece of equipment.

Log Home Store...this is a great company to get your log home supplies from.  They have stains, caulk/chink, log tools and MUCH MUCH more.  Not only have we found that they have a wide variety of products to choose from but if you order more than 250 pounds of merchandise your shipping is FREE!  The free shipping on our first order saved us about $70. 

Sashco...we have chosen to use several Sashco products.  We are using Penetreat, Capture Stain, Cascade Clearcoat and Conceal Textured Caulk.  The folks at Sashco have been more than helpful in answering all of our questions about the preservation and protection of our logs.

Design Intelligence...these are the great guys who drew the architectural and engineering plans for our home. Looking back through our posts you will see them mentioned several times.

Montana School of Log Building...Al Anderson will teach you EVERYTHING that you need to know in order to build your own log home.  His training videos are a plus, his bulls-eye scribe is a must and his week long training school will make all the difference in the success of your log home construction.  If you don't want to build it yourself...hire Al and his son Nick to come to your site and build it for you.

Paslode...we recently purchased a framing nail gun, and after much debate we chose the Paslode CF325Li...this awesome nail gun uses a lithium ion battery, and a fuel cell with strips of nails.  No more chasing a power cord or an air hose around the job site.  Floor Joist installation was fast work with this powerful gun.

Milwaukee Tools... Ken has used a variety of Milwaukee brand tools on the jobsite for years.  Now Lisa has found her new favorite tool...the Cordless Caulking Gun...this little gem has saved hours of time and best of all no hand cramps from "clicking" a traditional caulking gun. 

Ridgid... John's favorite new tool is our new screw gun, he was able to screw the subfloor down in record time.

More on architects.

      As we discussed in one of our previous posts, we are trying to decide on a company/person to design and make the blueprints for our home.  Here is a note to everyone for every kind of business.  When you say "I will have that ready for you by X day" make sure that you have it by then.  We originally had our designers narrowed down to 2 and then we found the name of a 3rd person, we liked the way their style looked and so we sent the information to them for a quote.  Meanwhile we cut one of the 2 that were from the original list because we reviewed some sample plans from them and we did not like the way they were written (not enough structural detail).  So #3 person comes back with a quote that has too much in it, we don't need the blueprints for plumbing, electrical and hvac...that will be discussed in a future post.  Well the quote from #3 had all of that plus some other things that we didn't want.  We replied (within 12 hours) that we would like these items (be specific) removed from the quote and why we didn't need them and we asked for them to resubmit the quote.  He responded that he had a big meeting that day but would have the revised quote for us by the next afternoon...it is now 1 week and 1 day later and we still haven't gotten the revised quote.  For us that shows that they do not stick to a timeline well, and we don't want to work with anyone who has issues like this.  So #3 is out the window for sure.  We have one more company, they are actually a handcrafted log home company, that is looking at the plans and we anticipate a response from them in a few days.
   So here is our thoughts on dealing with anyone who may be helping you with your home; manufactures, architects or even sub-contractors.
          *Make sure that you are comfortable talking to them, you need to be able to communicate your needs and wishes to them; that may even mean doing some research or studying on the terminology for that trade. For example when you are talking to potential plumbers make sure you know what kind of pipe they are planning on using for your home; copper, pvc or pex and if you know the differences in these then you can tell them what you would prefer or at least understand why they are using one type of material over another.
          *Set reasonable expectations.  If you submit something for a quote give them at least 5 business days to respond.  When we send something out for quote we usually ask that they email us as soon as they get it.  Then when they do, we give them 5 business days from the date of their response or if they tell us "we will have your quote by X" that is the time frame that we use.  If they can't get a quote to you in a timely manor then what makes you think they can complete the project on time.
          *Once you have chosen someone, make sure that you sign a contract with them...a signed contract is your only form of legal protection if something goes awry.
          *Pay them on time!  If you expect them to complete the project on time, you have to pay them on time.  Make sure that your payment terms are written into the contract.  However!  Make sure that they work that you are paying them for is completed; i.e. don't pay for the finished plumbing if the toilet is still not set and the house is not connected to the main water source.
          *Don't be afraid to fire someone!  Mind you, don't fire them in haste...make sure that you have thought it out and have weighed the pros and cons. Make sure that you sit down with them and let them know that you are not happy and why, if you need to point out any portion of the contract that they are not fulfilling; give them the opportunity to correct their shortcomings.  If in the end you feel that your contractor or anyone else who is helping you with your dream is not working out, let them go and contact your back-up person. Don't let yourself be taken advantage of by a contractor just because they are already on-site. 

May 2, 2012

Log Home Building School

       We really recommend that you plan to attend a log home building school.  There are lots of them out there to choose from, so again do your homework and choose the one that is right for you.  Some of them range from 1 week of training all the way up to a month or more.  While you may get a lot more hands on training at the schools that are several weeks long, we just couldn't afford to not be bringing in a paycheck for that long. 
      We narrowed it down to The Montana School of Log Building.  We purchased the video course from him as well so that we can have a heads up of what we will be learning when we arrive and we can have questions ready for him too. We spend a lot of our down time watching and re-watching those videos.  We will be taking the class in June, so we will make sure that we continue this post during and after the class.  We feel that it is a good thing for everyone who is going to build their house like this to take a hands on class. 
      You can watch all of the movies and read all of the books that you want, but it doesn't hold a candle to getting hands on experience with someone who really knows what they are doing.

Save your lids

                   Why on EARTH would you need to save lids???
    
     We know this sounds CRAZY, but save the lids from any canned item that you use.  Soup cans, veggie cans, any thing that requires a can opener...save those lids! Some have a similar lid on the bottom some have the easy stack bottoms, the easy stack bottoms are useless just don't worry about it. When we open a can we immediately wash the lid and dry it and put it in a specail container that we have, you will be shocked at how quickly they add up.  Last night we opened the container and counted the lids, we have saved nearly 100 lids in just 2 months. Well then we took a paint pen and marked on those lids giving each one a number.  We put them in numerical order and bundled them in groups of 25 and placed that group into a small baggie. When we start cutting trees we have a spreadsheet that we have made up that has basic information about each tree.  We will take those lids and nail one to the butt end of each log that we cut and then we can have an inventory of sorts of all of our trees. Here is the information that we collect about each tree.  The number of the tree, the diameter of the butt cut, the diameter of the tip cut, the length of the tree, which drying rack it is located on and any notes about that tree (standing dead, beetle kill, or maybe where we got it from).  We believe that this list will be very valuable when we are planning which log to use next while building the structure.
       
       So save those lids, if you don't think you can get enough on your own then ask somone to help save them too.  Keep in mind that you want to wash and dry them right away, and please be careful those edges are SHARP!

Floor plans and architects.

     Well so far we haven't done very many tough things.  However; one of the toughest things you will do is to agree on a floor plan!  We both had things that we wanted in the house, things that were important to us, it was just a matter of making it all fit and then making sure that it fit onto our property.  It seemed like every time we almost had it we were either going to end up over top of the septic tank; that is not where you want to be if there is a problem. Or we were too close under some large trees that we want to keep, but we don't want to be right underneath in case a limb falls off. At long last we have a floor plan that we can agree on, that fits our site and is easy to work with. 
     Make sure that when you are designing  your home that you can get logs that fit your plan; for example if you have one wall that is 60ft. long and the longest log you can get is only 40ft...then you need to rethink your plan.  Also remember that your 60ft long log will weigh about 1.5 tons when it is green, can you handle a log that big?  We overcame that by adding in extra corners, yes that means we have more notches to make but it keeps our logs shorter and easier to manage; and it helps to give our home a unique look.  One of our biggest goals while developing the floor plan was to make sure that our home didn't resemble any other home in the area but yet it needs to look like it fits the surroundings and that it totally fits our lifestyle. When drawing your floor plan ask yourself what are the important rooms in your home and start with those rooms and then add others in around them.  For us the Kitchen and the Great Room were the most important.  We have a large family and when we all get together we can sometimes feel cramped, we wanted to design the house so that there was plenty of room in the kitchen to prepare a big meal and plenty of counter space so that we could set everything up buffet style; and plenty of room to kick back and relax after we have stuffed ourselves.
     Now that we have this GREAT floor plan we have to find someone with a bit more knowledge about log structures to tweak the design and create a set of blue prints for us.  That is one of the on-going projects at the moment.  We have emailed our plan to several log home architects...and I stress to you make sure that they have done a log structure before, log homes are different from standard homes and many dimensions are different.  We received quotes from everyone that we emailed and they ranged from .85 per sq.ft to 7.00 per sq.ft; you can expect outdoor living areas to cost less for designing that indoor spaces. Don't be afraid to ask your designer for pictures of homes they have designed, samples of what drawings and prints they will be providing to you, references and so on.  One key thing to also remember is that you need to contact your local planning agency and find out about permits and building requirements. We are fortunate not to have any such restrictions in our area, but many people do.
     Trust your gut! When interviewing anyone who is helping you with your home, if they seem to hesitate or delay or side skirt a question, then take that as your first warning that something may be wrong.    A good example of this is early in our search for an architect we spoke with a man who spent 30 minutes trying to tell us all of the ways that we would fail at this endeavor, and he kept making snide comments about other drafting companies and more...We finally told him that we just didn't think he was the right person for the job; it was simple he DIDN'T BELIEVE in us or what we are doing and we didn't like his personality, we don't want to work with someone who is not on board with this project and who is telling us that it will fail before he even got to know us. So we have narrowed our list down to 2 different people and we are gathering more information about them, including ratings from the better business bureau and anything else we can find online. *Remember...the biggest or most well known is NOT always the best..and stay in budget*
                  Always have a back-up person or company in mind for every aspect of your project.

Where to begin?

     Where to begin is always the question when starting a large project.  Sometimes it seems like we can't find the beginning because we are too busy thinking about the middle or the end of the project.
Well here is our story....from the beginning.
     We got married in 1988 and we have always wanted a log home, but could never find the land and the money to build.  When we would find land, we were broke; when we had money land was out of reach. Fast forward to 2004 we moved to what we like to call "The Middle of Nowhere, Louisiana"  and believe me, we LOVE it.  After living in the middle of a large town, we are happy to have the very few neighbors that we have.
     We finally have the land and we can finally afford to build a house, as long as we do it ALL ourselves.  We spent months drawing up a floor plan that was what we thought we wanted and more months of sending that plan to various log home manufactures and handcrafters only to find out that the price of our dream had sky rocketed in the last 5 years.  We made up our minds years ago that we didn't like the look of small logs. (No offense intended to those of you who live or are building homes like that, if you love your home we are happy for you...it just isn't us.) We like the look of the large handcrafted logs with the scribe fit and the thin chinking.  So we decided that we were going to do it ourselves...ALL of it. Our philosophy is that if the pioneers could build a log home with animals and all hand tools, then surely with the use of modern equipment, chainsaws and power tools we can do it too.
     Step 1. Find a log home school, there are several to choose from.  We spent several weeks talking to the owners/teachers of various log home schools across the country. Make sure that you talk to them on the phone; tell them your dream, make sure that you have the skills and if they are excited to help you with your dream and you like talking to them...sign up for class. We have decided to visit Montana and learn from Al Anderson at the Montana School of Log Building.  We will be going there in June for his week long class.
     Step 2. Find your logs! This is where we are right now.  While we are waiting on our turn to learn the art of handcrafting from Al, we are lining up our logs....right now they are still standing in the forest!
     Step 3. Begin construction of your home. We are planning for this even now, remember planning is everything. Don't wait until the last minute and then discover that you are missing a piece of the puzzle that you should have anticipated months ago.
     Step 4. Finish your log home and live happily ever after!

Ok, ok, we realize that there are more steps to it than that....A LOT MORE!  So tune in here and we will take you through it with us, step by step.  We will try...not promise, but try to update this site often so that everyone can keep track of our progress. It might be a good idea for you to go to the bottom of the page and "subscribe" to our page so that you will know when we publish updates.

So let's begin...WELCOME to our log home experience;
                                                    The Bare's;  Ken, Lisa & John