Sep 5, 2013

At Last! Log Work.


Here we are posing with our first sill log...oh what a happy occasion!
While it seemed that we would never get to this point, we are thrilled to say that "we are stacking logs". Everything that we have done up to this point has been necessary, but tedious, because we were so ready to be stacking logs. Finally, at long last, we are placing our sill logs on the foundation.  A few days ago we selected the 3 logs that would be required to make our half sills. We took these logs to the mill and carefully aligned them to insure a near perfect half log. For many people the next step is to draw knife the log to remove the bark; we are fortunate that the bark falls off of dried Yellow Pine extremely easy. These logs were cut last year and there is virtually no bark left on them, and what is there falls off with little effort (no draw knife required).
For size reference, the log on the mill in this image is 17 inches at the butt and 13.5 inches at the tip and measures 31 feet long. (the tip end is nearest the camera)
 
With the half sills in place, tonight we fitted our first 3/4 sill log.  This means that we were able to scribe and notch for the first time in a while.  It was an extremely exciting evening for us, and our visitors. If you ever decide to take on a project like this, be aware upfront that you will have a lot of folks that want to come and watch the scribing and notching. You will also run into a lot of nay-sayers along the way too. Until they watch it in person they will have a hard time believing that it will fit together so well.
As you can see in this image our first notch fit nice and tight just like it is supposed to and once we tighten it down to the all-thread anchor rods it will be an amazing fit. After cutting the notches we put it in place for an initial fit and found that it was nearly perfect. After a very small amount of tweaking, we made a second attempt and it slid on perfectly.
We are tired but very happy to have this first cross log in place. Tomorrow will find us in the log pile finding the perfect log to for the opposite wall; just a few more sills and we will be going UP.

Sep 3, 2013

With Just A Little Luck

Some time ago we ran across an interesting story about "building the luck" into your new home.  It seems that many years ago it was considered lucky to put a coin into your home as you were building it.  I have found stories of people putting a penny in the foundation and others of people who put silver dollars under the sill boards. Some stories say that it is for luck and others say it is to bring prosperity to the homeowners.  Either way we decided not to take any chances.  We put a penny in the foundation for luck; and 4 quarters in the sill board under the first sill log.  We couldn't easily find a silver dollar and it seemed fitting to put 4 quarters instead.  Even though Orrin can't be here for the building project this will still be HOME for him and Courtney when they are on leave from the US Navy. So the penny is stuck and the quarters are in place; and as an added measure we all signed the sill board. We were so happy to have Orrin home for a long weekend so that he could put his quarter in place.


Here's to luck and prosperity 
for us and the future generations who will live in our log home.
 

Aug 10, 2013

Sill Board Installation

Well section 1 is READY for LOGS!  This morning John and Lisa went out and put several types of insulation in place and put the sill boards down.  This section is now water tight in case of rain, which is a possibility in the forecast for the next 5 days.

The first step was putting down the foam sill insulation.  This insulation is 5.5 inches wide and we had to cut open a slot for it to fit around the all-thread rods. It didn't want to stay in place for anything, so finally we put down a thin bead of caulk to help hold it in place while we moved on to the next steps.


Secondly where the plywood subfloor and the block wall meet we had a small gap, so we lifted the sill insulation and we used low fill spray insulation (from a can) to fill in this gap. We are trying our best to make sure that there is no way for moisture to get down under the floor during construction, and hopefully this will all help keep drafts out of the picture.


Lastly we put down 2x8 sill boards which had to have holes drilled in them for the all-thread rod to come up through. By design there is a gap under the sill board that will eventually allow us to slide the finished flooring under the sill and the log, but until then we didn't want rain water to have a place to hide. After much discussion it was decided that we would buy cheap 1/2 inch foam pipe insulation and cut in it half lengthwise to form a gasket of sorts. We shoved it under the sill board and then put in a few nails to hold it down. This can all be pulled out much later when we are ready to install the hardwood flooring.

OK...now to finish sections 2 and 3 and let's get to the logs!

Aug 9, 2013

Section 1 Subfloor

While on our jobsite we refer to the different areas of the house by sections not by individual rooms.  We have 3 sections; Section 1 is the Great Room, Section 2 is the Kitchen/Dinning/and Office, Section 3 is John's Bedroom/Bathroom and the Laundry/Mechanical rooms. 
We also refer to each wall by a specific letter (A-L).  This may seem strange to some, but for us it cuts down on the confusion.
 

So in section 1 we now have the subfloor down, we used 3/4" plywood, and we screwed the sheets down to the joists.


 After all of the plywood was down we went back and put silicone caulk on all of the joints to help seal out any water. 


 Then to protect the plywood from moisture and undue wear and tear of us walking on it we painted the entire floor with outdoor latex paint.  Since our main objective is to keep water out and not decorating we went to our local hardware store and bought "woops paint" from them.  ("woops paint" is a paint that is mixed the wrong color) 

 It is a little difficult to see in the picture, but the floor in Section 1 is cream, dark grey and baby blue.


 Buying "woops paint" is fun, not only do you get a variety of colors but it is also half price.  As needed we will go back and repaint areas where the plywood shows wear.  Just make sure that it is outdoor paint so that it will withstand the rain and dirt better.

As you can see, John is having way too much fun finishing up the painting, he is using 2 rollers at the same time.

Now we have to repeat the plastic, rock, subfloor, caulking and painting in the other 2 sections.

Moisture Control

Here in Louisiana moisture control is VERY important.  Anyone who knows anything about log homes will tell you that moisture is not your friend. So we are doing everything that we can to control the amount of moisture under the house. 

We are painting the lower blocks with a rubberized coating to prevent moisture from coming in. Later on we will post about the French drain as we install it. We have to be cautious not to get the coating too high up on the wall, eventually we will be making and installing faux rock and it will not adhere to the waterproof coating.


Our prints call for 6mil plastic to be put down under the house as a vapor barrier, we decided to take it one step further and put a thin layer of   washed smooth rocks on top of the plastic, this will help keep the plastic in place and also provide a layer of natural insulation.

Now let's get that subfloor down to keep water off of the rocks.

More Beams and Joists

 Getting the main beam under the center of the house took a little extra engineering on our part.  As before our engineered prints said that we should be nailing 2x4's together to make these beams; but since we have a sawmill we have decided to make these beams out of solid log.  The entire span of the center area is 46 feet, and the prints call for 2 different size beams. Each end of the main beam is 4 inches wide and 1 foot thick.  The center section of the beam is 8 inches wide by 1 foot thick.  If we were making this beam with 2x4's nailed together it would be easy enough to just add the extra boards where they were needed.
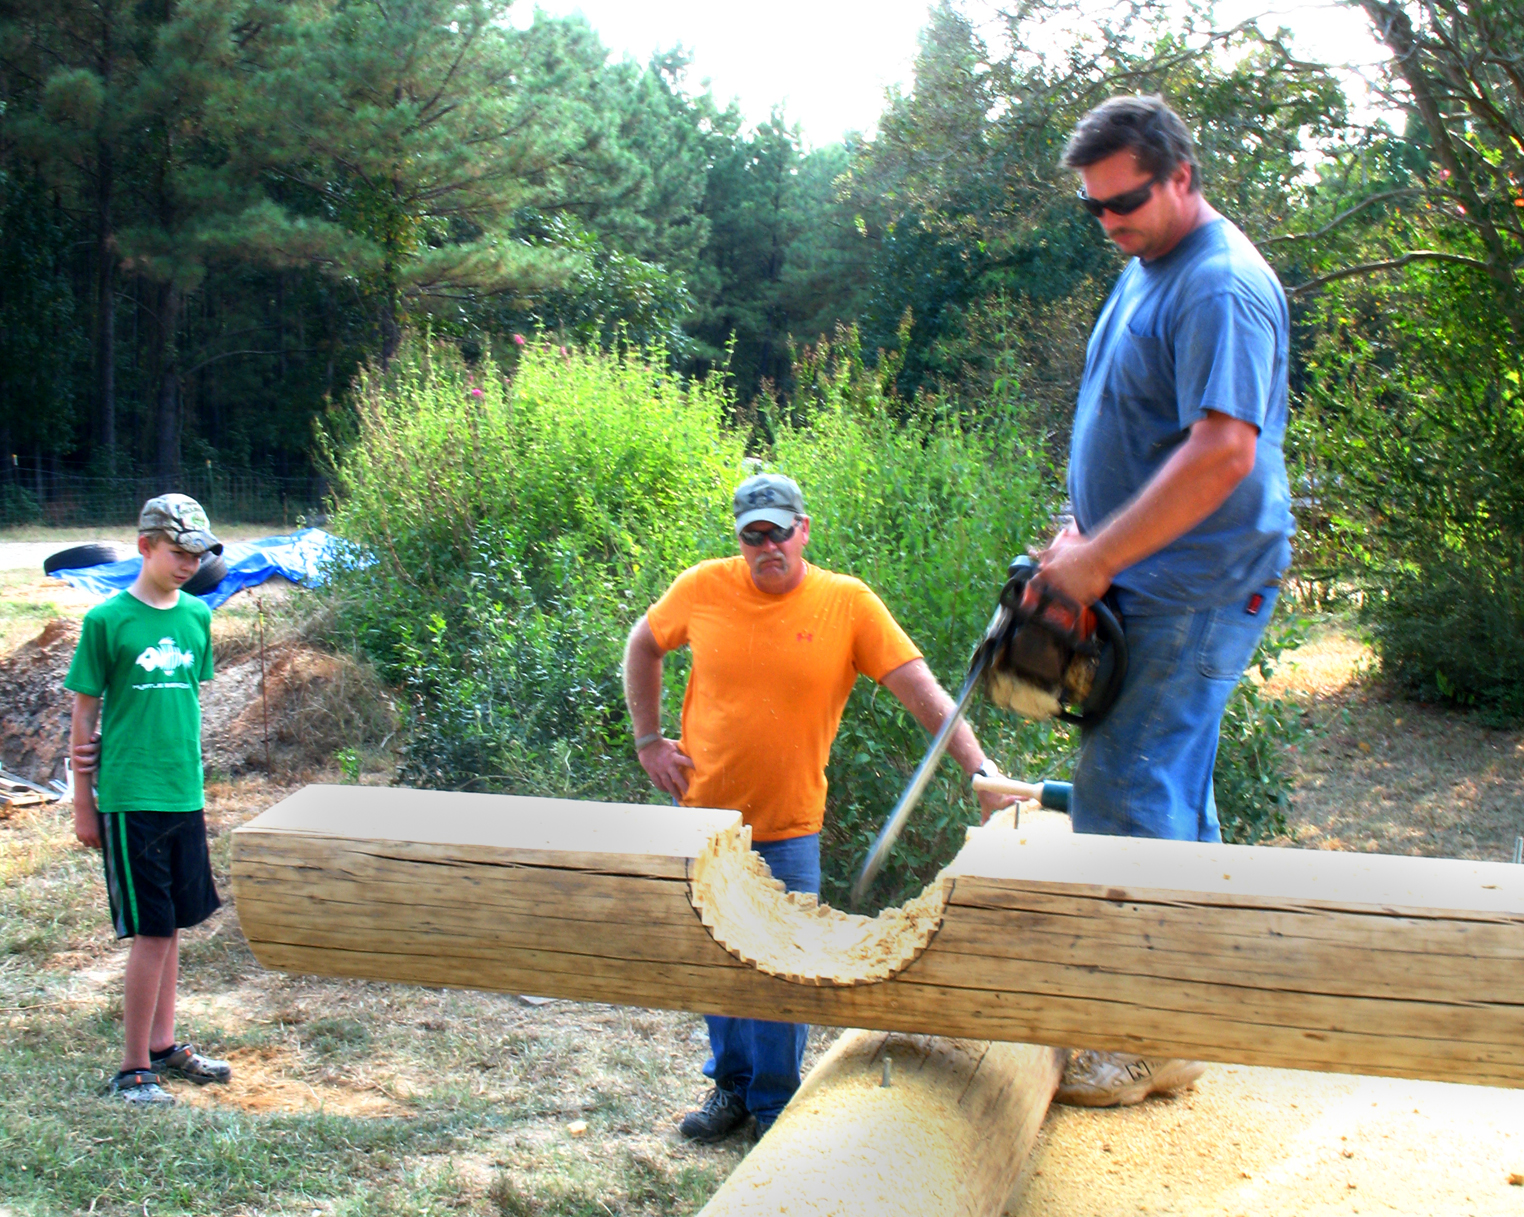
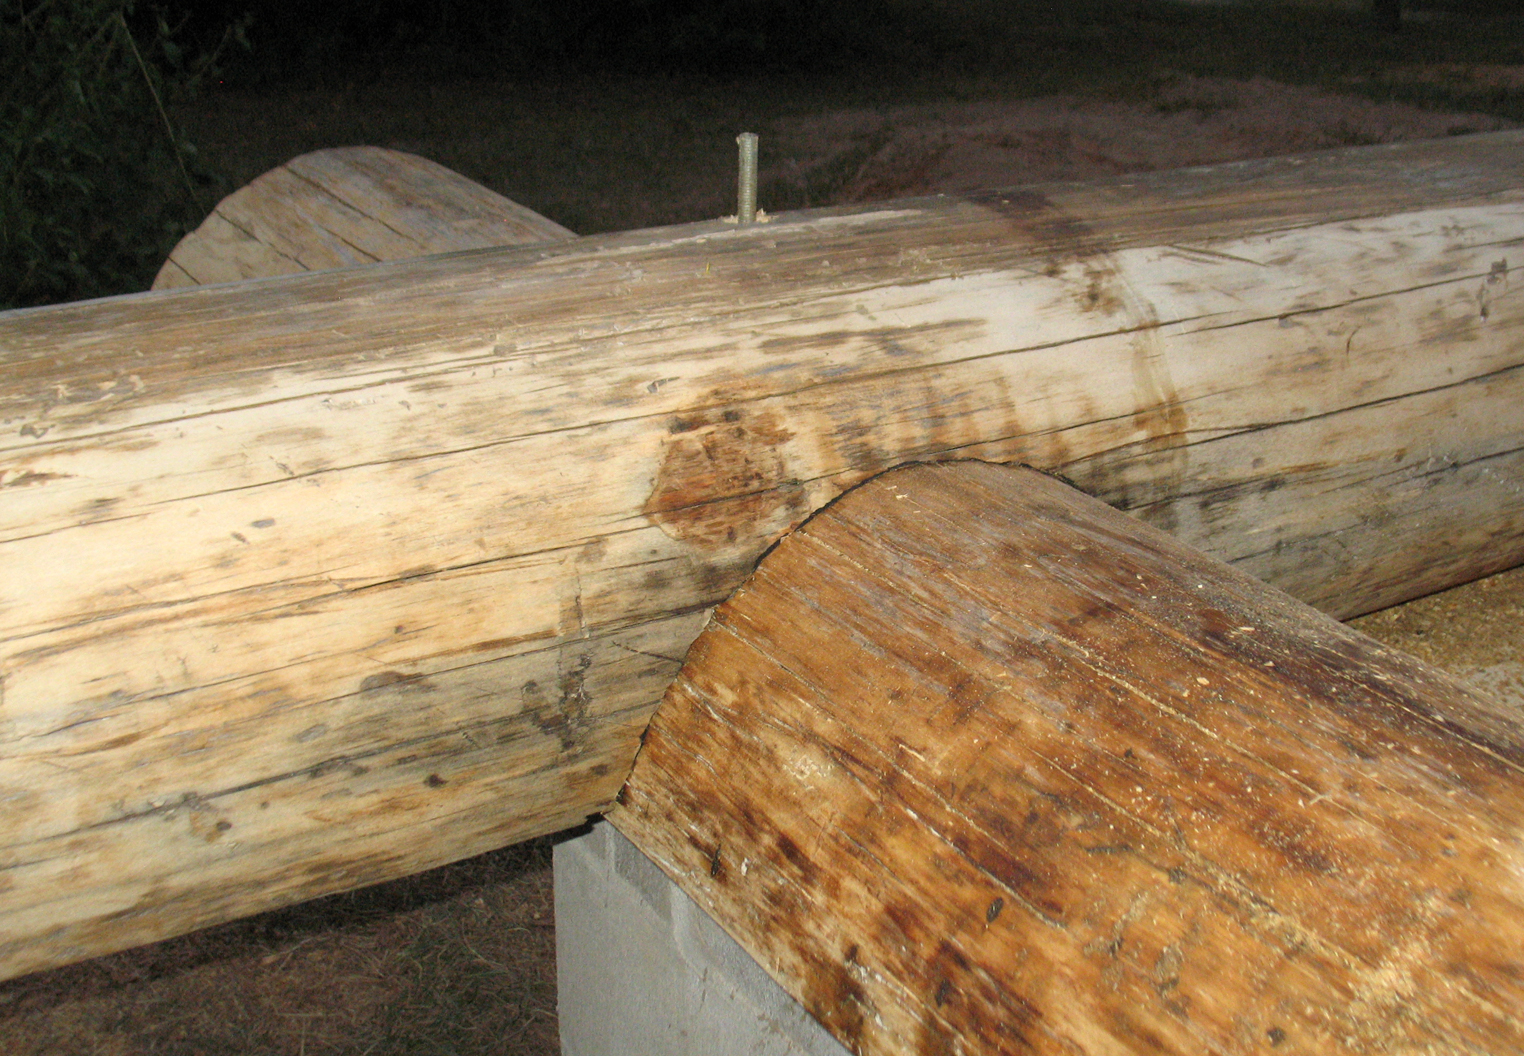
 However, buy using solid beams we had to get creative with how we jointed them together.  We finally decided that we were going to use the chainsaw to cut out a groove that would fit the smaller beam into the larger one.  For extra reinforcement we drilled holes through in 2 places and put 3/4" all thread rod through and bolted it down.  You will also note in the picture that we had our friends at Caddo Sheet Metal make us a cap for the concrete block piers so that our beams are not sitting directly on the concrete.


Once the beams were in place we started installing the remaining floor joists. 


This brings us one step closer to putting down that first log.

Jul 24, 2013

Floor Supports

After filling the hole with concrete it is time to install the floor system.


John and Ray are putting the beam in place in what will be the Great Room.


After the beam is set in place Ken and his new nail gun get to work putting down the 2x10 floor joists.  


You will also notice that there are all thread rods sticking up; they are welded to rebar that was
secured into the concrete.  This is what we are using for anchor bolts. 

Foundation Filling and Beams

We have used our sawmill and cut the beams that will support the floor downstairs.  For us it was better to cut one solid beam rather than nail 2x12's together.  They range in size from 4x12 up to 8x12 and the longest one is over 26 feet long.


It is hard to find a tree that is big enough to get a solid beam of these sizes, so on some of these beams you may note that there is still a little of the outside edge, not to worry this will be the side that goes down which will leave the flat side up for nailing. 


Another part of the foundation work is going back and filling in all of the blocks with concrete.  Originally we were going to fill every other one, but it is proving to be more difficult to do this so we just decided to fill them all. 

John and I have been mixing concrete nearly every day for over a week, we are about 75% finished with that and we will finish it up on Thursday.

Pouring into small holes is proving difficult, which not only adds to the time that it is taking but also to the amount of wasted concrete mix.

A helpful note, keep the drying concrete mix scraped off of the blocks very good, it will help when installing the rim boards.

Having FUN!

While getting the work done is important, it is equally important to have fun (safely) while working.  After all of the work is through, it will be the funny things that stick in our memories.
So with that being said, here are some funnies from us!

John would like to point out that you should NEVER fall asleep on the job!  We will not wake you up we will simply build you into the wall.  Getting out of the wall when you wake up is your problem.


Have fun but remember SAFETY FIRST! Or these heavy beams could be on you!


Please NOTE *no idiots were harmed during the making of these images.


Foundation Wall

This was what the site looked like before they arrived
While we may be good at a lot of things, we decided that we were not good or fast at laying concrete blocks.


So we searched around and found a block mason and hired him and his crew to come out an put up the block walls for us. 
This was at the end of day one
At the end of the second day they were done with the foundation blocks.  Now it is back to pouring concrete for us!

This was at the end of day two.  The foundation wall is up!


An End To The Delays

The early part of this year was a series of delays.  Rain, cold weather and illness played a huge part in delaying our project.  These things combined with Ken being out of town has put us really behind.  Hopefully we are back on track now and I will try to keep this site update a little better.

Jan 10, 2013

Rain Rain Go AWAY!

There really isn't anything new to post since the rain just keeps coming down.  Our site is very flooded right now and more rain is expected over the weekend and next week.  I am afraid that we will pay for all of this rain by having an exceptionally dry summer.

Dec 12, 2012

Cold and Rain

Wishing for Warmer & Dryer Weather!

The last few weekends we have not been able to lay blocks either due to rain or cold. So for everyone looking for an update, please pray for some dry days and some warm weather.  All of our research says that unless you are a professional mason you shouldn't attempt to lay blocks if the over night temperature is expected to be below 40 or if rain is forecasted within 12 hours of the last block you lay.  So at this rate it is going to take a while to get the block wall done.

Christmas is right around the corner, which means we have family coming in and Ken will be working a lot of overtime so we may not post again until after the New Year.

Merry Christmas and Happy New Year!

Flooded Foundation
Update:
It rained for the 3rd weekend in a row!  Only as you can see it rained a lot more this weekend than it had before.  We are going to see if it will dry out on it's own over the next few days of sunshine, but if not we have a pump to get rid of the excess water.  Rain rain go away!


Dec 3, 2012

Foundation Blocks

       We may have mentioned in previous posts that we are not building on a slab, instead we are building on a crawl space and we will have a concrete block wall for our foundation. This type of foundation is not used very much in our area but it is highly recommended when building a log home.

Our first 17 blocks.
       This weekend we were able to begin the task of stacking blocks. Our crew consists of a plumber, a photographer and a high school student, none of which have ever buttered the first block.  Ken has watched masons at work on the jobsite, and Lisa has watched hours of video instruction on the subject; needless this should be an adventure.  Since we had to make a few attempts to get the right mixture of the mortar and we are still trying to find a good rhythm for the job; we didn't get a lot done the first day.

The good news!  The next day when we checked on the blocks they had all held together...Yeah!

In the weeks to come and as weather permits we will be stacking more blocks, it is a very detailed undertaking.  We have decided that we need to weld additional rebar to what is already there so that it comes up to the top of the foundation, next we will stack everything 3 blocks high (8x8x16 blocks) and follow that up with pouring concrete into every hole that has rebar in it and finish up by stacking a 4x8x16 and a 4x4x16 block on top to make ready for the floor joists.

With the Christmas holiday fast approaching we can safely say that we won't be finished with the blocks by the end of the year.  While all of these steps are necessary we are all ready to start stacking logs.

More Concrete Work

Footings for the fireplace and several piers.
In the crawl space of our home we will have 7 piers and a foundation for the fireplace and each of those had to have a 12" deep footer.  We are proud to say that those footers are now poured and curing.
In a few days Lisa and John will go back and take off the forms and fill in around the footers and hopefully get the ground smoothed out some.

Nov 19, 2012

Welding

While we were getting the initial foundation footing ready we discovered that it was quicker to weld the pieces of rebar together than it was to use traditional rebar ties. 

Now that the perimeter footer is in place we have turned our attentions to the footers needed for the 7 piers and the fireplace.  We chose to weld these rebar sections also. 
 
The plus side of this is that John got to practice his welding skills too.  In the picture you can see that John is welding the fireplace rebar and behind him you can see the pad and uprights of rebar that will go in each pier.  We hope to have the piers and fireplace footings poured in concrete this weekend.

Nov 14, 2012

Research ~ Research ~ Research

We fully believe that research is the key to making the right decisions.  We don't go buy a new car without doing several months worth of research on different brands and models (although we usually come back to Ford and Mustangs are a family favorite), we just feel more secure in our choices if we have studied them to death.
At any one time we are researching and learning about several different topics, this week our list toppers are ...
1) The size of a fireplace so that we can determine the size that we will need to pour the fireplace footer.
2) Different types of metal roofing; with a top runner being Interlock Slate Roof.
3) How to make your own rock for the fireplace, foundation wall and around the porch posts. These "rocks" are made from colored concrete in a mold, it is a lot more time intensive but we project the cost savings to be HUGE! (over $5000 saved)
4) How to lay cement blocks.
Of course we will post links to the companies that we choose to work with, when we make the final decision.
Since we need to know the size of the fireplace footer before this weekend that one had to take priority, and next will be the block laying and we have to make sure that we get it right. (You-Tube videos are GREAT!)
Even though we won't be needing the roof or the rock for quite a while, it is good to have a game plan.  I have estimated that if I make the rock myself I will be able to make about 24 rocks per day and it will take me about 3 months to make all of the rocks that I need, but I can wait for warmer weather to get started on those.  The roof seems to be one of the hardest decisions for us; we like metal roofs but we want to do something different than all of the other log homes out there.  Most log homes that you see have a hunter green standard metal roof, and while we agree that this is a great look we are trying to figure out how much of a statement we want to make. (also how big of a statement our bank statement can handle!)  We may end up with a standard metal roof and just choose a different color or we may find something else along the way that is unique and affordable.
So grab an extra cup of coffee (our favorite is Kona from The Bad Ass Coffee Company) and get ready to Google your fingers off.

Nov 13, 2012

Pouring Concrete


The concrete footer is finally done!  With the three of us and some help from Randall, Glenn and Ray we were able to get the entire footer done.  We had no choice but to do it over a span of a few days so we had to make some cold joints in the footer, but it all worked out OK.

Lisa and John did the mixing, we used a premixed sand and gravel from our local gravel pit mixed that with water and portland cement and ta-da...we have concrete.  (side note...if we can do it, ANYONE can do it)


Ken put the mix in the forms and smoothed it out making sure that the cold joints were in the right places according to the prints and making sure that the mix was in and around the rebar for the best compaction.


With the help of family and friends who came over on various days we had them run the tractor back and forth between the mixer and the forms.
 
We still have a few more things to pour, but they are small.  We have a total of 7 piers inside that need to be placed and the footer for the fireplace.  The toughest part of that is going to be the fireplace, we don't know which one we are going to use so it is hard to know just how big to make the footer.  The print calls for 6" in each direction in addition to the size of the fireplace unit, so at this point we have looked at several companies online and we have chosen the dimensions of the largest one and we will add our 6" to that figure; it may end up being overkill, but we don't want to guess too small since adding concrete later would not be an option.
 
Although no one likes mixing concrete, try to get as many friends or family to help you as you can get...you will NEED them!

Nov 8, 2012

Our Final Prints Have Arrived

At long last we have the final prints from the architect in hand!  They were nice enough to provide us with the foundation plan quite some time ago so that we could go ahead and get started on the dirt work and the rest of the foundation, but now we have all of the prints and it is signed and sealed by the architect and the engineer.  (Imagine that you now hear a huge sigh of relief!)  We don't want to bog down the site by posting the entire plan but here is the drawing of what the front of the house will look like.  If anyone would like to see the rest of the prints please email us and we will send you an e-mail version.

Ready to Pour Concrete

Just before the concrete went in the forms.

This is what our site looks like just before we began pouring the concrete. 
Rebar is bent and welded in place...bring on the concrete!
The forms are in place, the rebar is welded in and we are ready to go!  Our plans called for rebar to be horizontal in the footer area and to have upright pieces every 32" on center.